Hello friends!
Sorry it’s been quiet on the ol’ blog, but if you follow me on Twitter, you’ll get plenty of commentary on the legal news of the day. (I’m @legalinspire on Twitter. See right column.)
Today, though, we’re going to take a little detour, though our destination is very relevant to intellectual property law, information security, and a few other topics near and dear to my heart. Specifically, we’re going to look at one of the purest Open Source devices available for non-I’ll-just-build-my-OWN-damn-OS programmer types: the FreedomBox. Even more specifically, I’m going to show you how to build the cheapest sort of FreedomBox you can build from scratch. (First there’s going to be some background, so if you just want to skip to the building part, click here. Warning: this is very long and there are a lot of pictures.)
But what is a FreedomBox, I hear you say? (I keep telling you to nix that Google Home device. Do you listen? No.) That’s easy. A FreedomBox is a computer running the FreedomBox Foundation’s Pure Blend build of Debian Linux. Clear? Clear.
No?
All right. A little background. You’ve probably heard of Linux, which is an Open Source version of the UNIX operating system. It comes in a huge variety of different “distributions,” or “distros,” which are specific configurations of the operating system which are put together for a specific purpose. That purpose can be application-specific (e.g., a distro that’s meant to work on home media systems like Element OS) or more general (e.g. a distro that’s meant to work well in educational environments like Edubuntu.)
Linux is Open Source and “free” software, but it’s “free” as in beer, not always “free” as in speech, as the saying goes. (You don’t have to pay for it, usually, but you might be limited in what you can do with it.) And some distros have elements which are not free and/or not Open Source. It’s complicated. But going back to FreedomBox, the purpose of the FreedomBox distro is to be, as much as possible, free as in both “speech” and “beer.” It’s a subset of the Debian distro of Linux, which is meant to adhere as closely as possible to the principles of Open Source. More here, as well as a good general explanation of the above concepts: https://www.debian.org/intro/free
The other purpose of the FreedomBox is to put privacy and security in the hands of the user to the greatest extent possible. More on that here: https://freedomboxfoundation.org/foundation/
Here’s the heart of it:
Great privacy technology already exists. But using it requires technical skills beyond those of most activists, journalists, scholars, and ordinary people. That’s a problem we’re trying to solve with FreedomBox: we arrange a lot of complicated software into a simple user interface that can be used by almost anyone. From villages in rural India to dorms at American universities, our user community is large. But we want to make it even larger because the public still feels hopeless about data scandals, cyberattacks, and surveillance. By developing and advocating for FreedomBox, the Foundation aims to restore hope in a free and open internet and reaffirm the primacy of user rights, one user at a time.
“Why We Do It,” https://freedomboxfoundation.org/foundation/
A FreedomBox is designed from the ground up to be secure and to not rely on technologies that are at the mercy of commercial corporations, who can do all kinds of things which reduce your privacy and information security. It uses only free and Open Source software.
A few last points before we actually get started with the FreePi.
First, as has been pointed out on by a Twitter friend, the really cheapest FreedomBox you can build is to find a computer you’re not using any more, or one somebody was going to scrap, and use that. FreedomBox builds are available for most sorts of computers, and it doesn’t need a lot of power or memory. But then we wouldn’t have an excuse to go to the computer store and we can’t be having that. And in more practical terms, the FreePi, as you’ll see, is extremely energy-efficient, compact, and portable. Anyway, if you do have an old computer sitting around, by all means feel free to use it.
And on the other end, if you don’t want to actually build one yourself, you can buy a pre-assembled one, the Pioneer. They cost 82 Euro or about US$90 as of this writing. They’re pretty nifty. See them here:
https://freedomboxfoundation.org/buy/
We’ll be using a Raspberry Pi 3 B+ Single-Board-Computer. These are widely available online and in larger computer stores. (I bought mine at MicroCenter, which has amazing hobbyist pricing.) This computer is completely self-contained and fits on a single small printed circuit board about three inches wide. For short we’ll call it an “RPi.”

This computer, which runs at 1.4 Gigahertz and has 1 GB of RAM, costs… US$29.99. The next model down, the A+, has similar specs but fewer ports and less RAM and costs… US$19.00. The cheapest model – the Zero, which is basically a computer on a DRAM board – is available at MicroCenter for as little as five U.S. dollars.
IMPORTANT: As of this writing, there are only FreedomBox builds for the RPi 2, the RPi 3 B, and the RPi 3 B+. It is possible in theory to reconfigure the build to run on a 3 A+ or a Zero, but that is way beyond the scope of this post.
Note that I’ve added heat sinks (those shiny ridged aluminum things) to this one, which is optional. (They cost a few more dollars.)
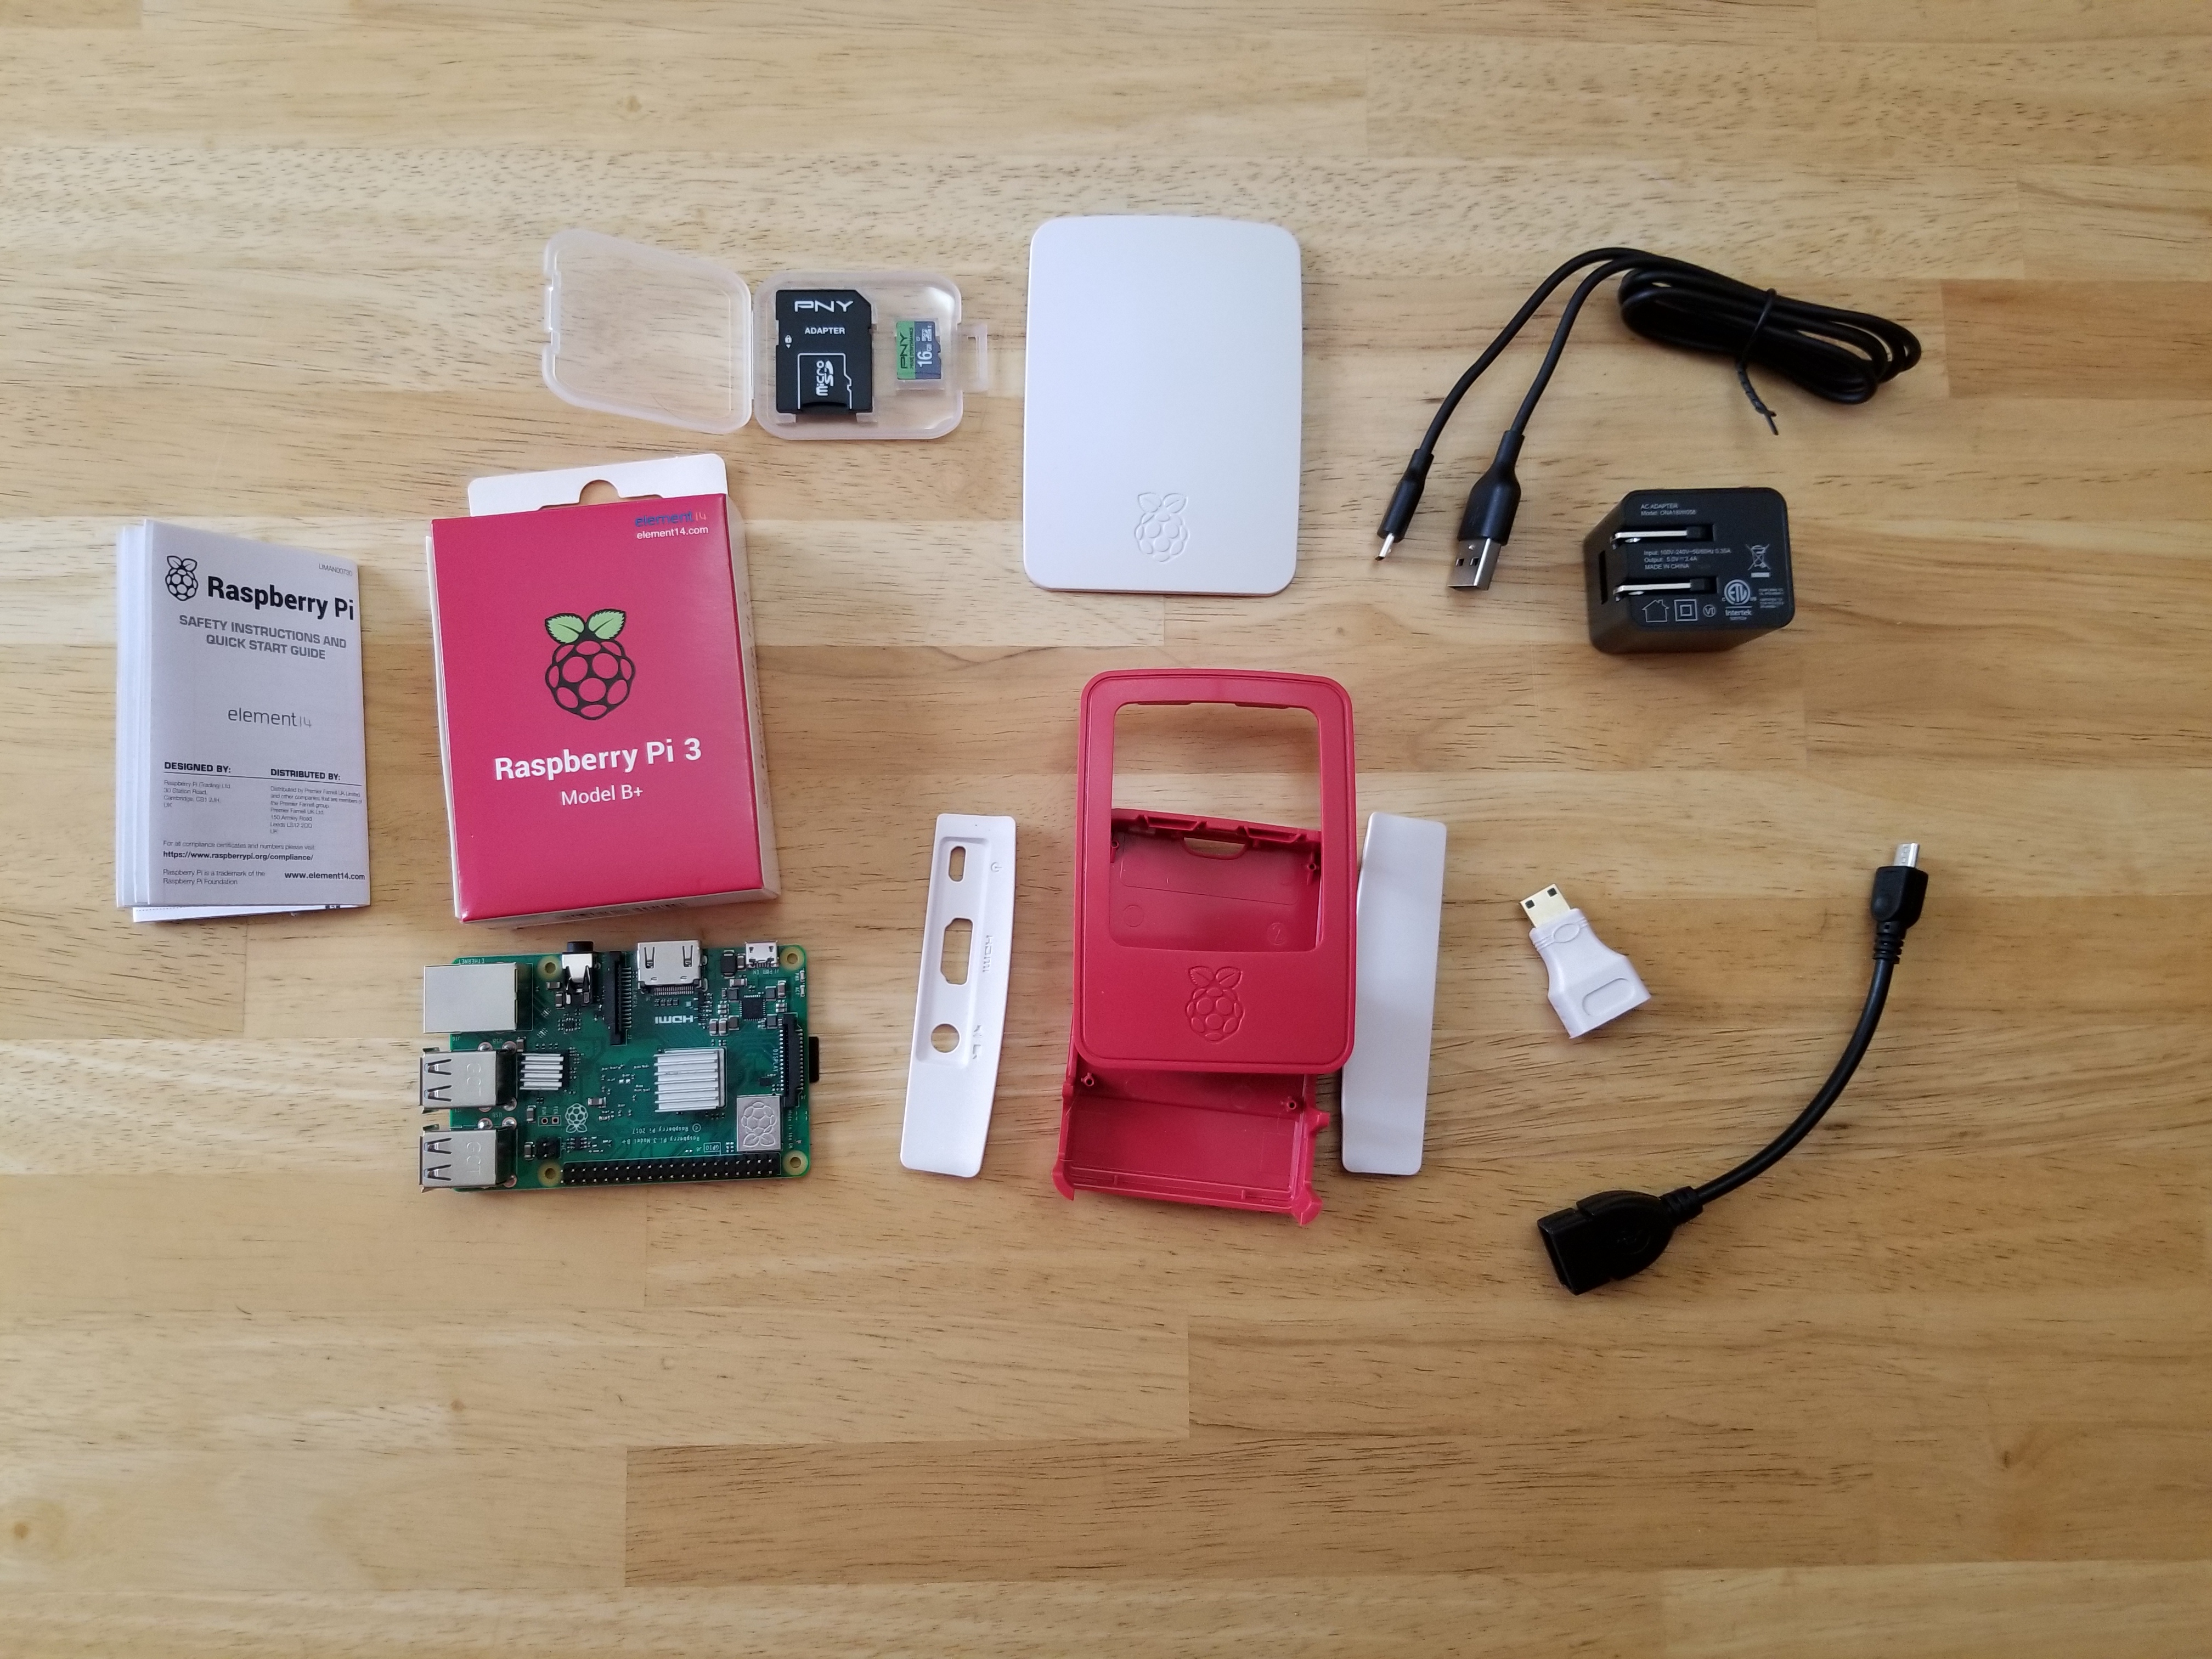
Here’s a picture of the stuff you’ll need (except a USB-Ethernet adapter, since we don’t need one for this configuration) plus a few things which are nice to have when you play with RPi’s. You will also need an Ethernet cable. These are available at most electronics stores and even many big box stores like Target (or even Menard’s!)

Aside from the RPi, there’s:
1) An “official” RPi case, which are cheap (US$8) and well-made. Technically you don’t need a case at all, but you should get one. There are tons of them in all kinds of styles. I like this one as it’s a good value and very portable.
2) A micro-USB to USB adapter cable and a mini-HDMI to HDMI adapter (needed only if you use a Zero)
3) A power supply and micro-USB cable to hook it up. RPi do not come with power supplies (aka “phone chargers.”) I bought that one at WalMart for $2.00. The maker of RPi’s says that you should have a power supply that can provide at least 2.5A. You can probably get away with less, but I would recommend just using one with plenty of power. All power supplies are marked with their maximum output, though it may be in mA. There are 1000mA in an A, so if it says 500mA, that means it’s 0.5A and it’s too small. If it says 2000mA, that’s 2A and it will PROBABLY be fine, but your mileage may vary.
4) A microSD card and SD adapter. RPi’s also don’t come with “hard drives.” They use microSD cards like you might put in your cell phone for extra storage space. I bought that one at WalMart in a 2-pack for US$9. If you buy your RPi from MicroCenter, they will sell you a 16GB microSD card for US$3. If you want to use the thing for media, you can get a bigger card – Amazon sells a 200GB card for thirty bucks. Whatever size you get, get the fastest one you can, because this is the main storage for your computer. The speed of a microSD card is printed on it: it’s a number in a circle which ranges from 1 to 10, with 1 being the slowest and 10 the fastest.
STEP ONE
As set forth above, get your RPi, a MicroSD card (I suggest at least 16GB as they are practically free with a box of Cracker Jacks, but feel free to go bigger,) a power supply, and a case together. Feel free to take them out of the packaging and fiddle with them, that’s part of the fun. Just be careful with the RPi and the exposed circuitry. Don’t put anything together yet.
STEP TWO
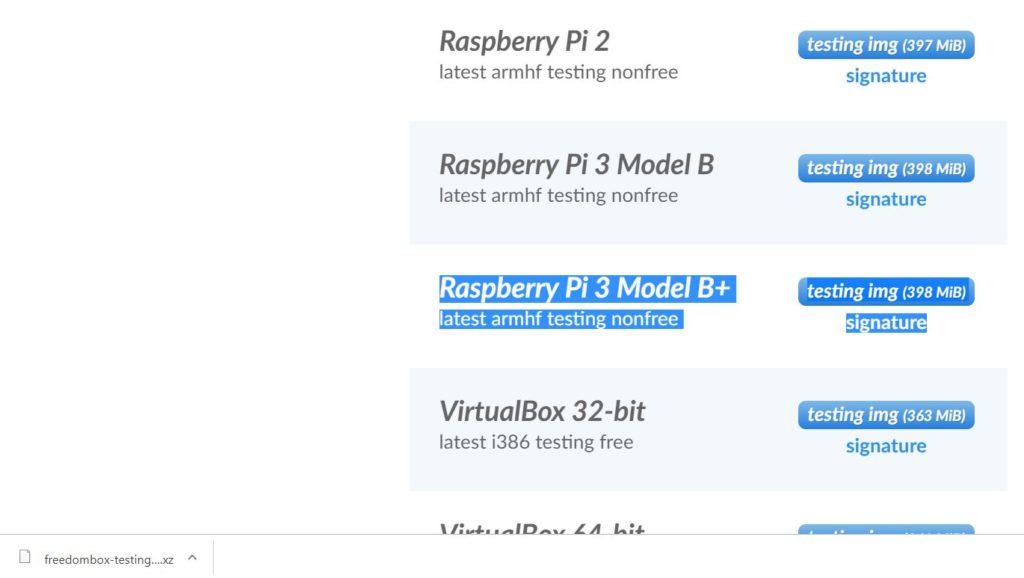
Go to this website on your regular PC and get the correct FreedomBox distro for RPi 3 B+:
https://freedombox.org/download/testing/
Note that for reasons I won’t go into, there’s no “official” build for RPi 3 B+, only a “testing” build. Don’t worry about that. It also says “nonfree,” which again is for reasons I won’t go into. Don’t worry about that either. Click the download button and the file should download to your computer.
There are more complete instructions on this page:
https://wiki.debian.org/FreedomBox/Download so go there if you have any issues with this part.
STEP THREE
This is the first tricky part. You’ll need to copy the distro onto the microSD card, but you can’t just drag-and-drop it, because the file you just downloaded is a compressed archive with the disk image inside it, not the ready-to-use OS files. (This is a big difference if you’ve installed NOOBS/Raspbian before.) You need a special program that can write the distro onto the card properly. There are detailed instructions on the Download page I linked to in Step Two, but I’m just going to assume you’re using Windows and run through an example sequence. (If you aren’t on Windows the Download page suggests programs for various OS’s.)
Go to this website: https://www.balena.io/etcher/ and download the Etcher program with the button at the bottom of the screen. Once it’s downloaded, run it and install the balenaEtcher program. Then run that. It’ll look like this:

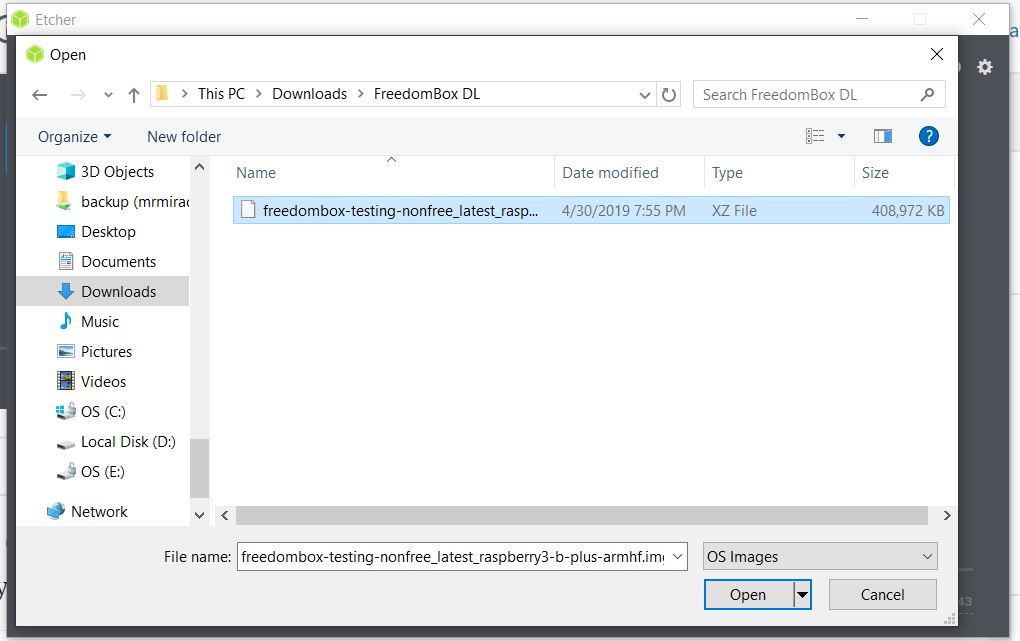
Click on “Select image,” which will open a file dialog box. Find the distro that you just downloaded (it will probably be in your Downloads folder.)
Once you do that, put the microSD card in the adapter and put it in your computer’s read slot. If your computer doesn’t have an SD card read slot, you’ll need one of some kind – they are very inexpensive and you can get them almost anywhere. Just look for a “USB SD Card Reader.” Anyway, once you’ve got the card in your computer, the balenaEtcher program should see it right away. If not, click “Select drive” and find it in the file dialog. We’re ready to rock.
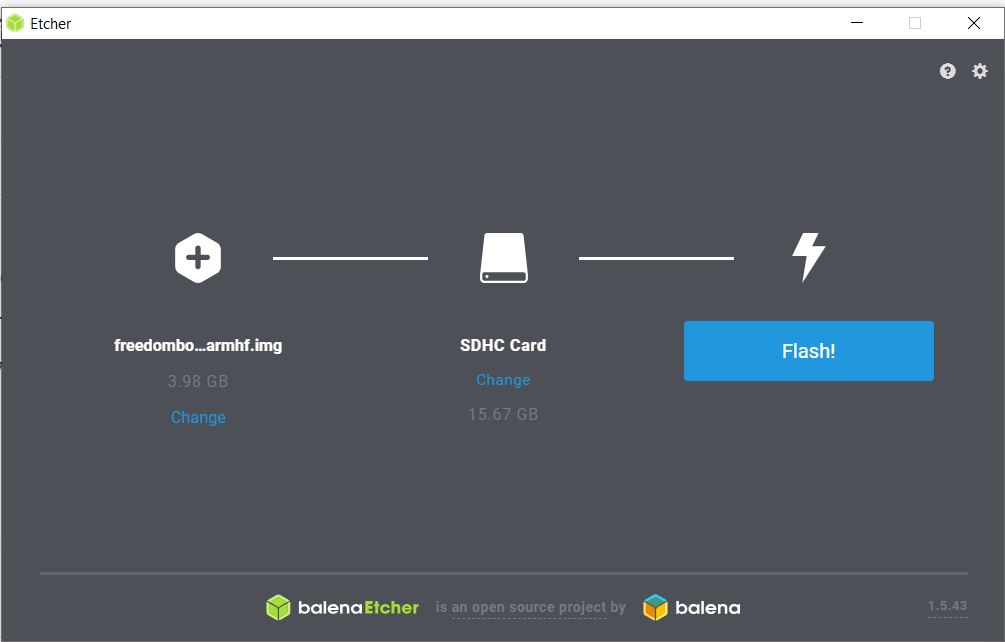
Now just click “Flash!” It should start writing the FreedomBox distro to the card. In the meantime, go get something to eat, maybe walk around a little, get some exercise, because this is going to take a while.
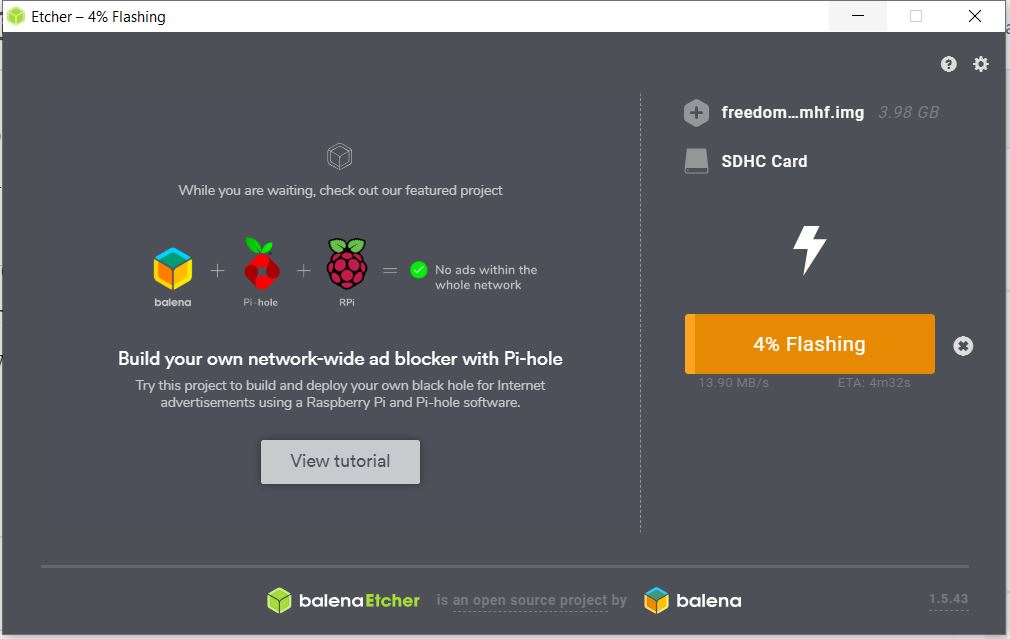
Okay I lied. My computer is REALLY fast. So it’s done:
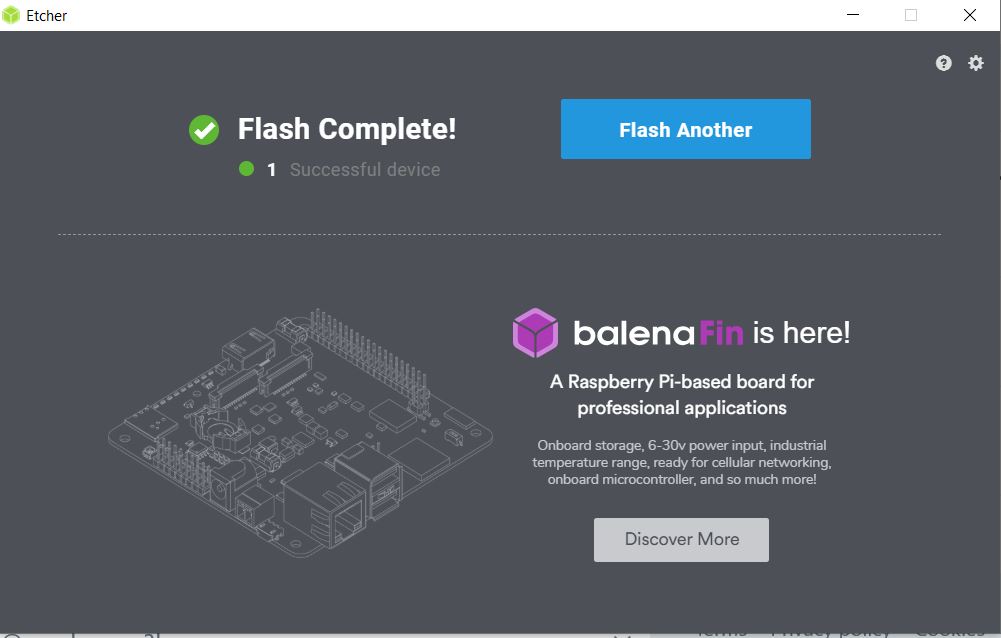
Go ahead and pull the SD card out of your computer/the SD card reader. It shouldn’t be mounted as a disk so you don’t have to Eject it first.
STEP FOUR
Take the microSD card out of the adapter and put it in the microSD slot on the bottom of the RPi.

STEP FIVE
Put the RPi in the case and assemble it.

The easiest order of assembly is:
1) Insert RPi into lower part of case. Line up the Ethernet/USB ports with the end of the case that has a slot for them.
2) Pop sides into place. Start with the side that has the holes for the ports and make sure it lines up with them.
3) Pop upper part of case onto lower part. The end marked with the raspberry/with the vertical parts goes on the end where the Ethernet/USB ports are. It won’t go the wrong way so don’t force it.
4) Pop the lid on. The end of the lid with the raspberry on it goes on the end of the case that has the raspberry on it. It likewise won’t go the wrong way.
By the way, all these cases look exactly alike. If you’re only going to build one RPi, that’s fine, but otherwise, I suggest labeling them. I use a regular labelmaker. (All of my regular RPi are named after comic book characters, but my FreedomBoxes are a little more utilitarian.)

STEP FIVE
Now the fun starts. (Well, putting stuff together is fun, but now we actually see if we did it right.) Go to your Internet router and find the Ethernet ports on the back. Plug the Ethernet cable into the Ethernet port on your Internet router and your assembled RPi. Then plug the power supply into the power supply port on the RPi (it’s on the side, next to the HDMI port.) A red light should come on at the end of the RPi which doesn’t have any ports.
As of this writing, due to a known bug, what you have to do now is wait about ten minutes, unplug the RPi, and then plug it back in. It won’t finish the boot sequence the first time, and it won’t finish it until it’s had time to almost finish it. So just do it this way. It can be persnickety.
STEP SIX
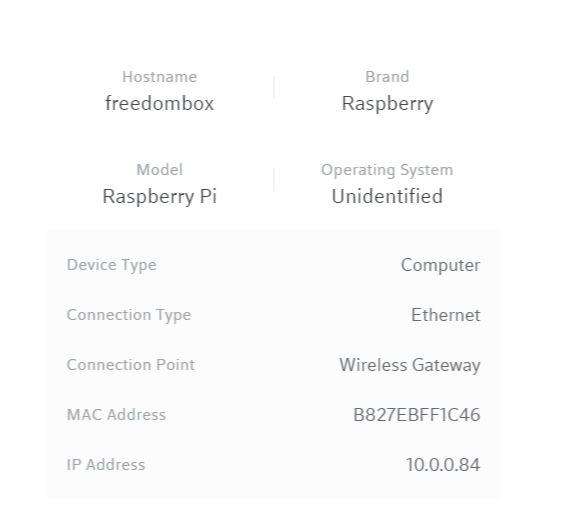
Log into your router and find the IP address of your new FreedomBox. It will be connected in as “freedombox.” There are so many ways to do this I can’t possibly tell you exactly what you need to do, but here’s an example of what it looks like on my Comcast Xfinity router:
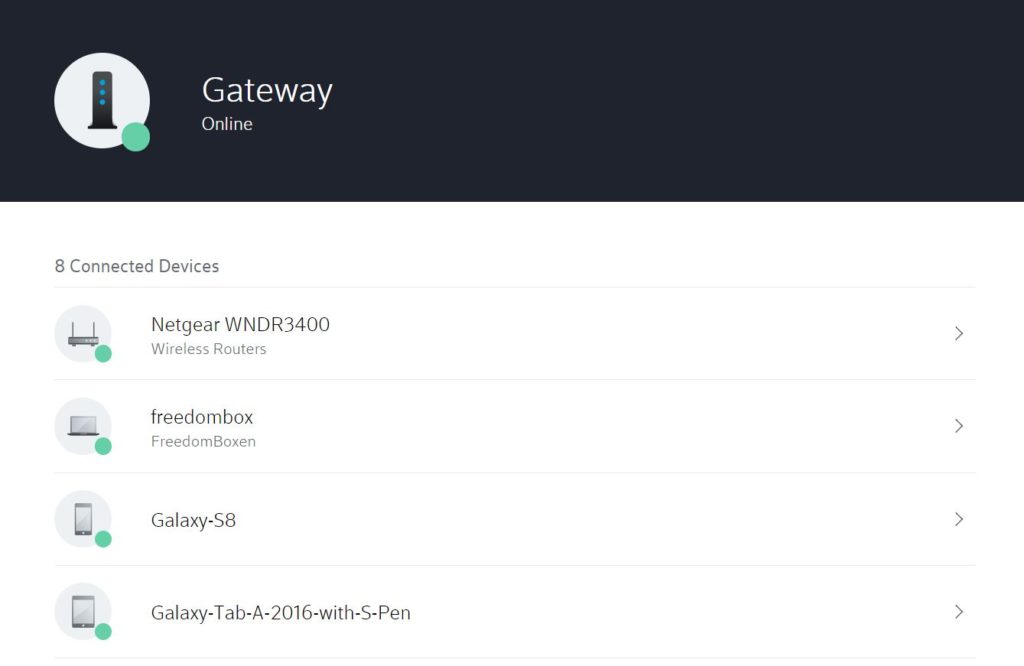
On the IP scheme that my router uses, the freedombox has been assigned the IP address 10.0.0.84. I found this under “Device Details” by clicking on the device in the list and then scrolling down.
STEP SEVEN
Open a new browser window, and type in the IP address of the device we learned in the prior step, then hit return or Go or whatever. You will almost certainly get an error involving a security certificate. That’s because the Freedom Box doesn’t have one and doesn’t need one yet. It’s fine. Click “Details” or “Advanced” or whatever and tell the browser to open the site.
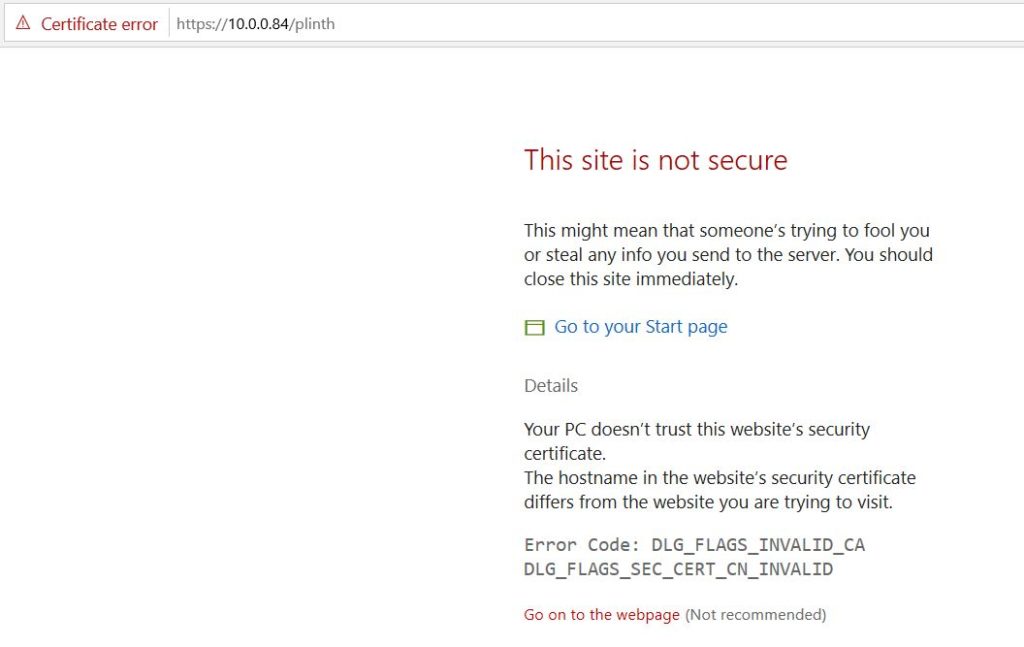
STEP EIGHT
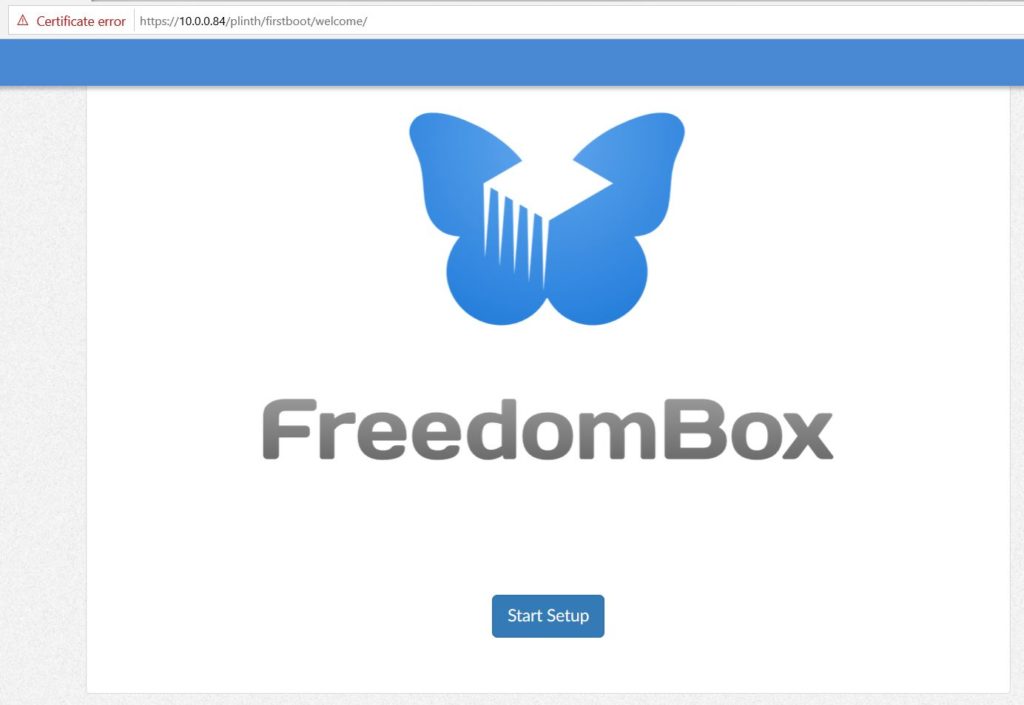
Congratulations, your FreedomBox is online! You’ll be at the welcome screen, which uses an interface called Plinth. Click “Start Setup.”
STEP NINE
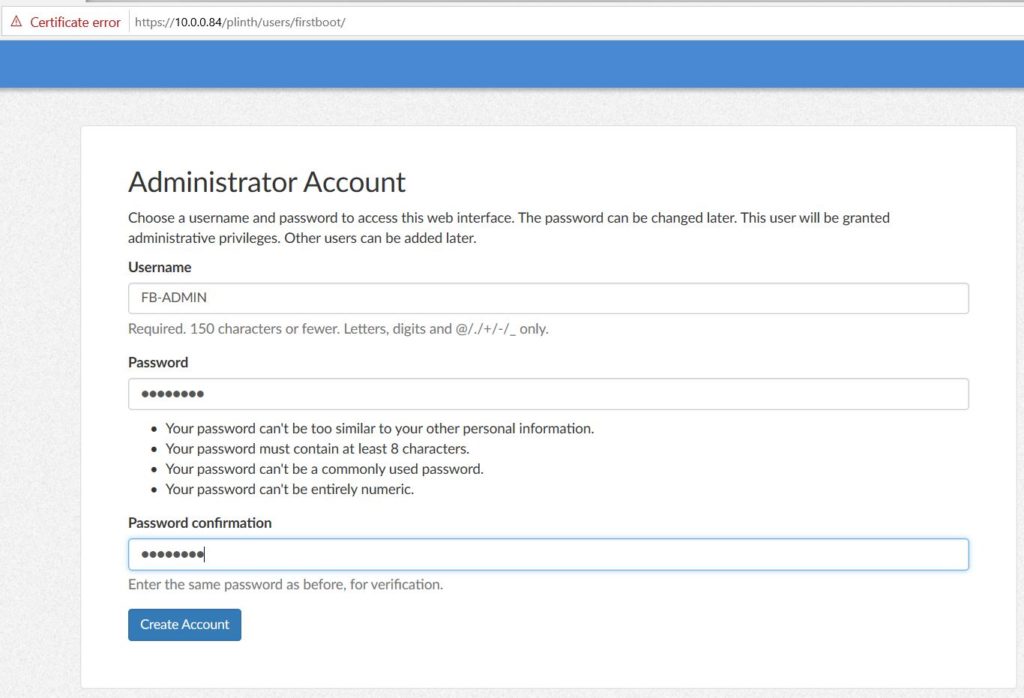
Put in an admin account name and password. It will make you use a reasonably secure password. WRITE. IT. DOWN. Or better yet use a good password manager like LastPass.
STEP TEN
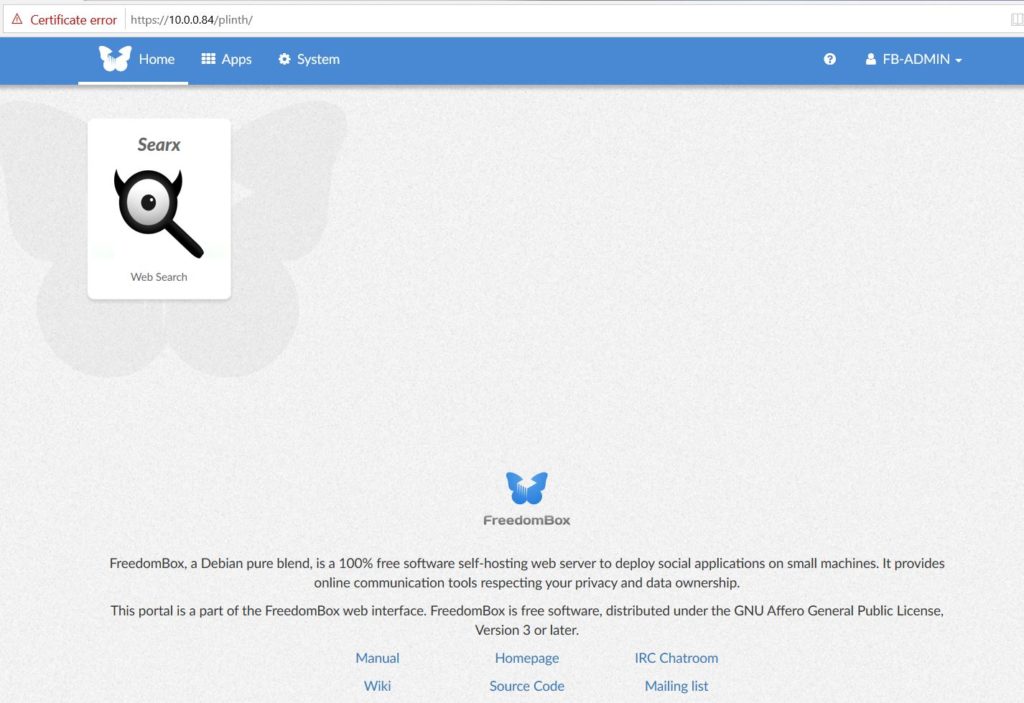
Click “Install Apps” and go to the Install Apps tab. Clicking on an app will give you information about it and the option to install it. Note that just clicking on it on this screen will NOT install it. Once you install an app, it will be visible on the Home tab. Here, I’ve installed Searx, an anonymous web search tool.
Normally, this is where I’d turn you loose – what the apps do and which ones you might need are the next part of the story. However, we’re not done yet, because we don’t want to be tied to that silly Ethernet cable when our FreePi has a perfectly good wireless networking interface. So let’s get hack-y!
STEP ELEVEN
Things are about to get weird again, because due to various issues with FreedomBox (as of this writing,) we have to go the LONG way around the barn to get access to the parts of the FreedomBox software that we need to change to use the RPi’s wireless networking interface.
Go to the “System” tab and click on the “Cockpit” app.
Once you’re in the Cockpit app screen, install the app. Once it’s installed, it will appear on your Home tab.

STEP TWELVE
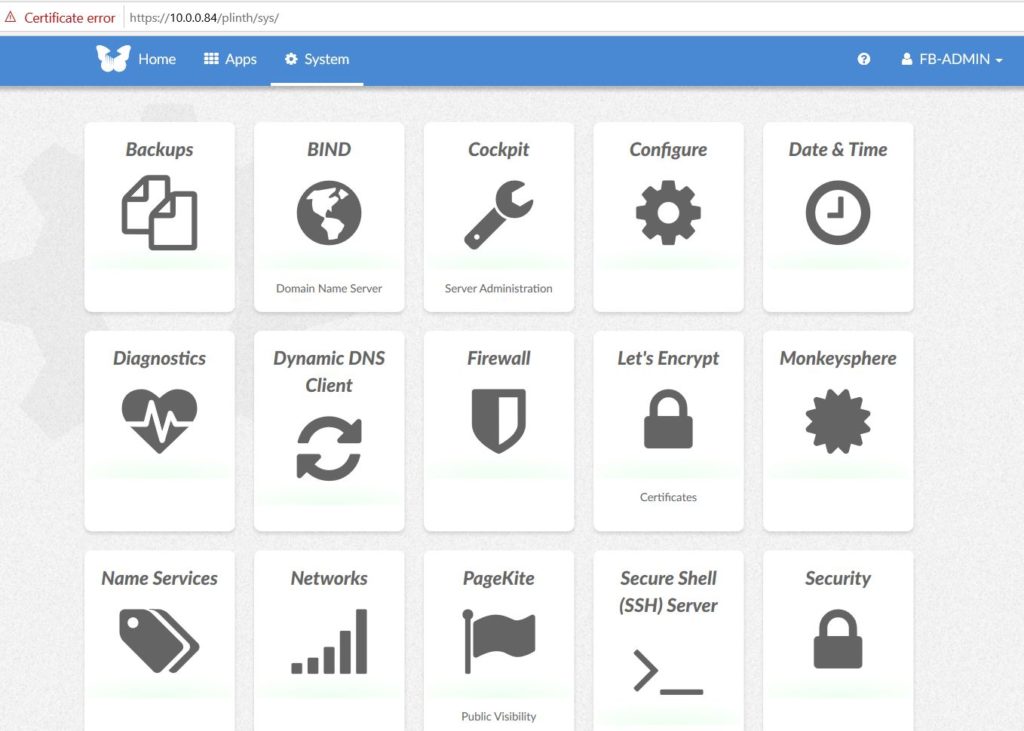
Go back to the System tab and look for the “Pagekite” panel. Once you find it, click it.

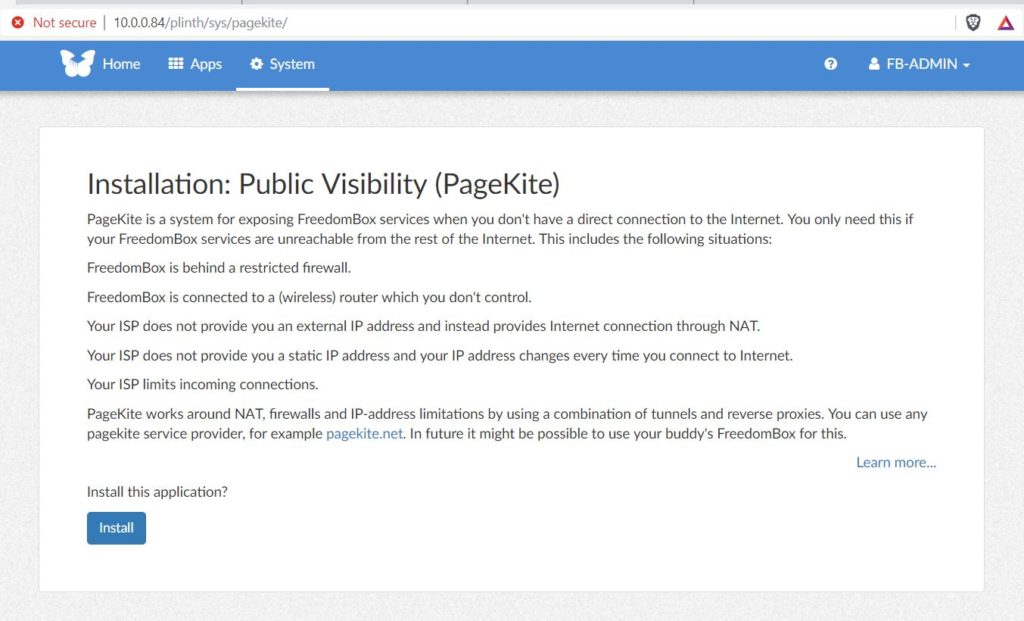
Now install the Pagekite app.
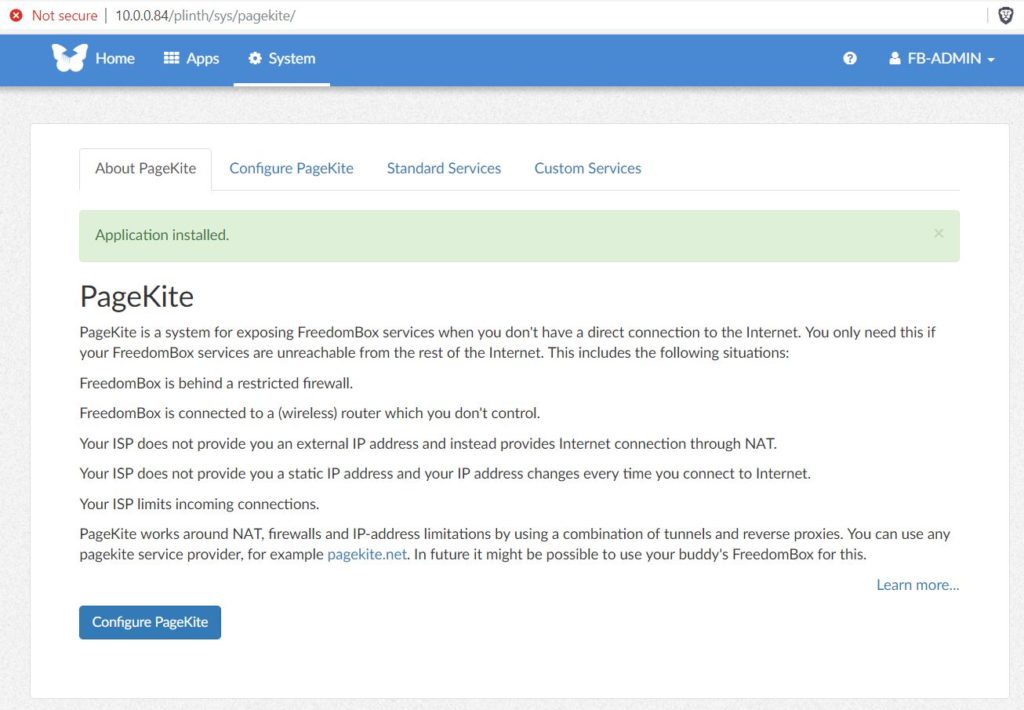
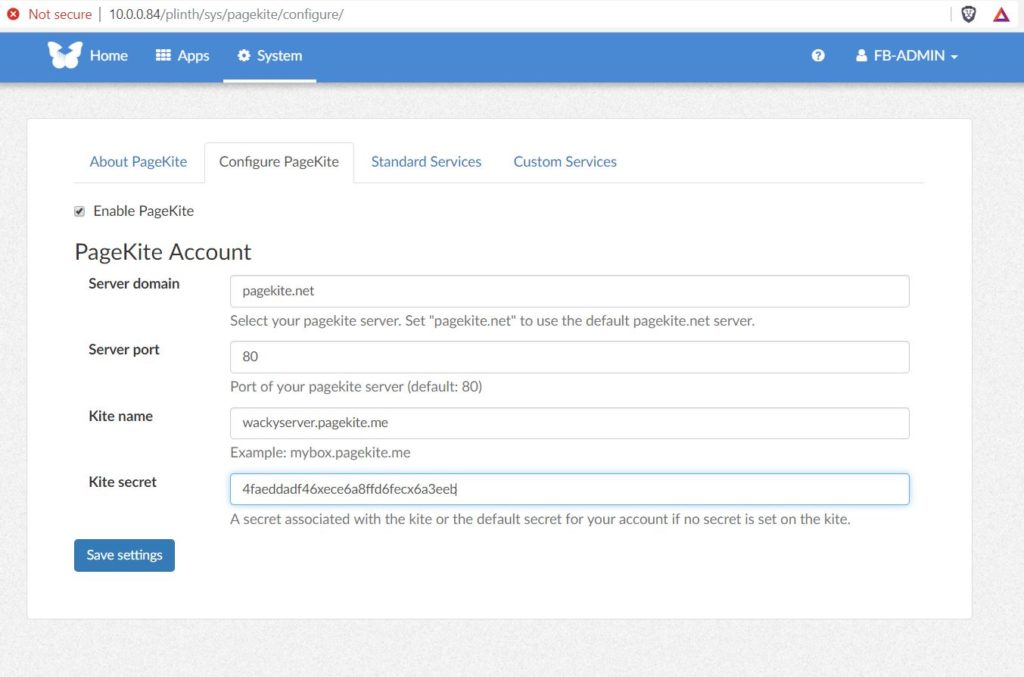
Once it’s installed, click “Configure Pagekite.” We’ll come back to this in a minute.
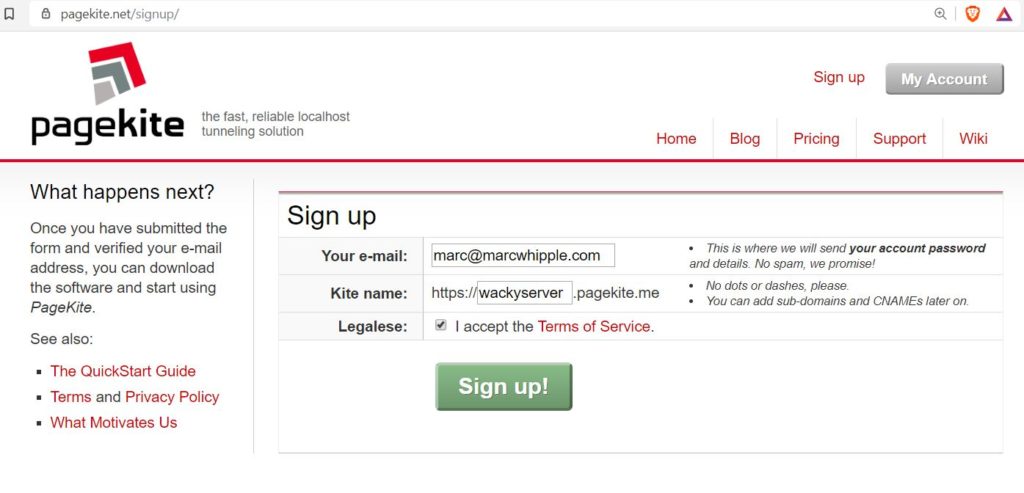
Now open a new browser tab or window, and go to https://pagekite.net. Click on “Sign Up” at the top right, and then fill in the simple registration info. I called my FreePi “wackyserver” and used my email: obviously you will need a new name and use your own email address.
You’ll get an email from Pagekite: follow the instructions to activate your account. Once you do, you’ll see the Pagekite screen. Click on the “Your Details” link to see your pagekite details.
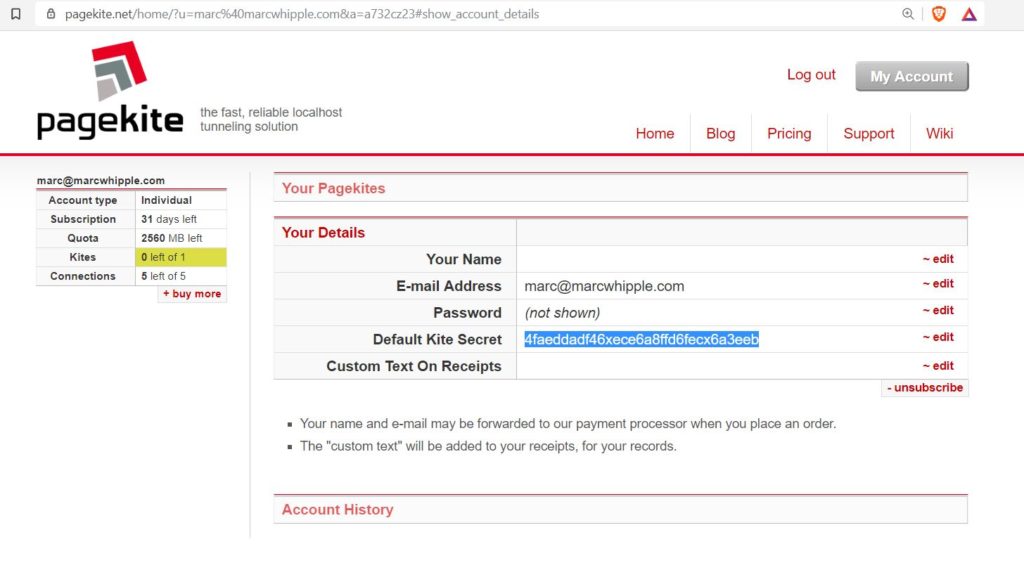
You need to select and copy the string of characters next to “Default Kite Secret.” (The highlighted text in the screenshot.) Then go back to your FreedomBox page and put in the information.
Click “Save Settings.” You will have to wait a minute for the changes to be saved. Once that’s done, click “Standard Services.” On the Standard Services tab, turn on all the services and click “Save Services.” Don’t worry about the “evil Internet” warning. We’re going to turn this off as soon as we’re done.
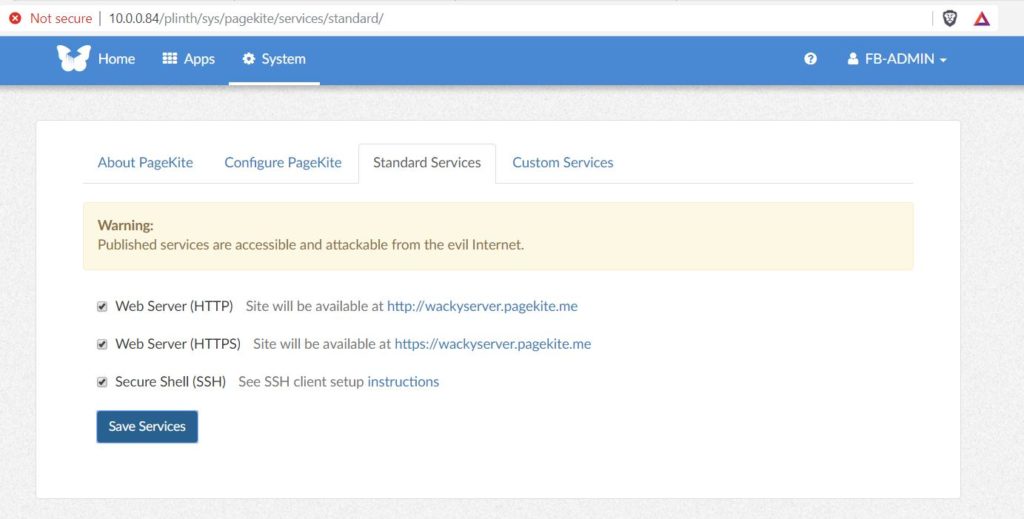
Once it confirms that the services are enabled, open a new browser tab or window and go to the address you created on pagekite.net. For me, it would be http://wackyserver.pagekite.me. You’ll get the same “Certificate Error” song and dance you got in Step Seven. Click on “Advanced” and click “Go On,” or whatever you did the first time. You will get the same login screen you did then. Log in again. You will be back to the Home screen.
NOW we’re ready to do some hackery. Click on “Cockpit.” You’ll get a login screen. Login with the same name and password you log in at the Home screen with.

You’ll get this lulu of a control screen:
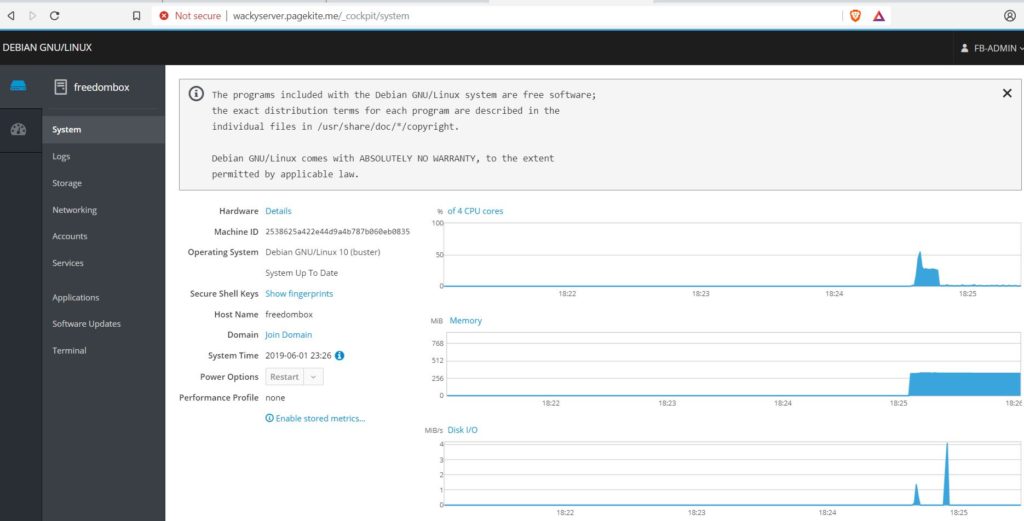
Click on the link at the bottom of the list marked “Terminal.” You’ll get a command line prompt.
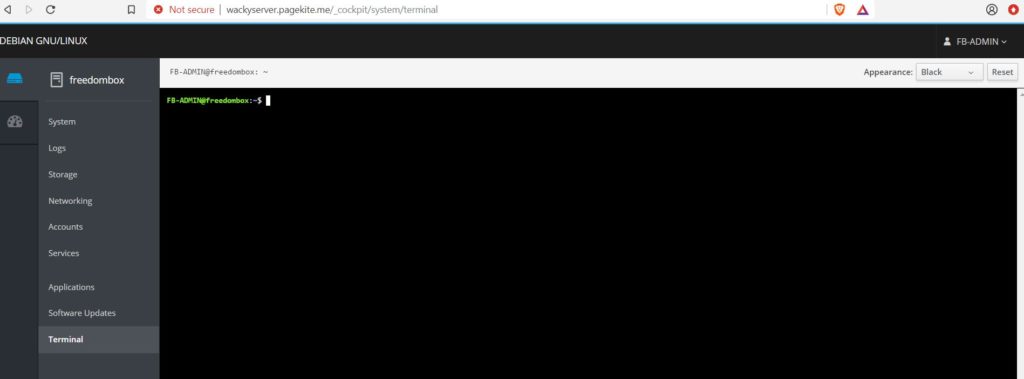
If you were wondering, you couldn’t do this from the first tab (where you just accessed the FreePi via an IP address) because if you try, it lets you log in and then the screen just goes blank and I don’t know why this works because it totally should not but it does.
Anyway now we have access to the very guts of the FreePi, metaphorically speaking. From the command line we can do darn near anything. And take heart, because we’re almost home! We just need to get the drivers for the RPi’s wireless networking and install them. This involves a lot of commands that will, to be frank, look like gibberish. If you are familiar with command-line interfaces, some of them will also look sort of inefficient. But if you do them in this order, it should work. You can use copy and paste, but you must right-click and do “Paste” in the Terminal window. Control-V will not work. Note that you do not type anything in that is in bold italics.
Type in each of these commands, and hit Return/Enter at the end of each.
cd /lib/firmware
sudo mkdir brcm (it will ask you for a password – use the same one you’ve been using)
cd brcm
sudo wget https://git.kernel.org/cgit/linux/kernel/git/firmware/linux-firmware.git/plain/brcm/brcmfmac43602-pcie.bin (This is all one line from “sudo” to “bin”, then hit Return/Enter.)
sudo apt-get install firmware-b43-installer -y
sudo wget http://legalinspiration.com/wp-content/uploads/2019/06/freepi.tar.gz (This is all one line from “sudo” to “gz”, then hit Return/Enter)
sudo tar -xzvf freepi.tar.gz
sudo nano /etc/apt/sources.list
This will open a file in a text editor. Use the arrow keys to go to the top of the file, and add this line:
deb http://httpredir.debian.org/debian/ stretch main contrib non-free
Then hit control-X, then hit Y (no control key), then hit Return/Enter. Now back to entering commands.
sudo apt-get install linux-headers-$(uname -r)
sudo apt-get install broadcom-sta-dkms
sudo apt-get update -y
sudo apt-get upgrade -y
sudo mv /lib/firmware/brcm/brcm/*.* /lib/firmware/brcm/
Okay, that’s all the commands. Now back to the setup process.
Go back to the original web page (the one with the numbers in the address bar.) Click on your login name at the upper right and pick “Restart.” Confirm that you want to restart.
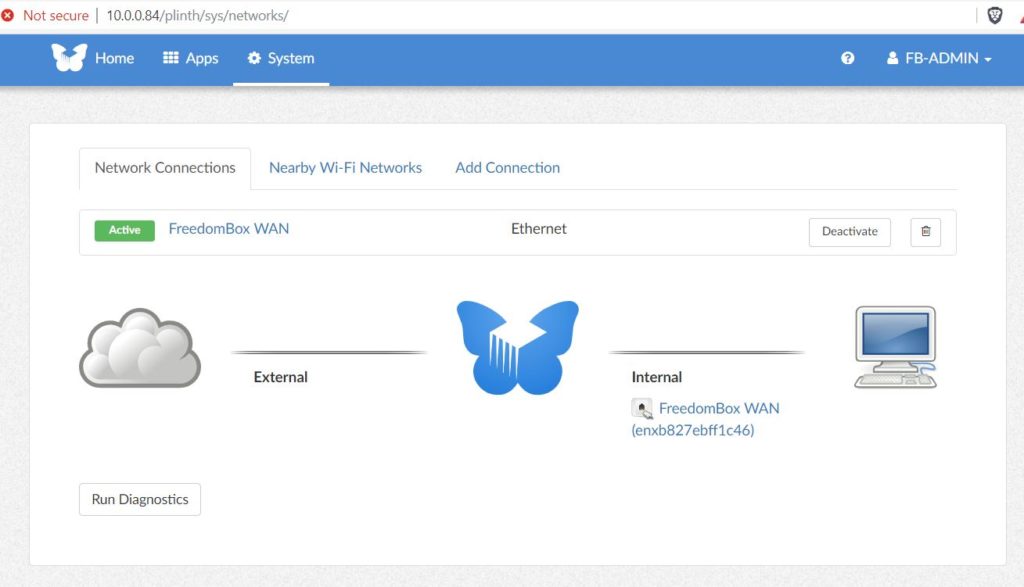
The connection will drop. Keep hitting “Reload” on your web browser until the Home screen reloads. (You’ll get all kinds of error messages until the FreePi has finished rebooting and reloading the web server.) Once it does, go to the Settings tab and then click on “Networks.”
You’ll get this screen. Click on “Add New Connection” on the right.
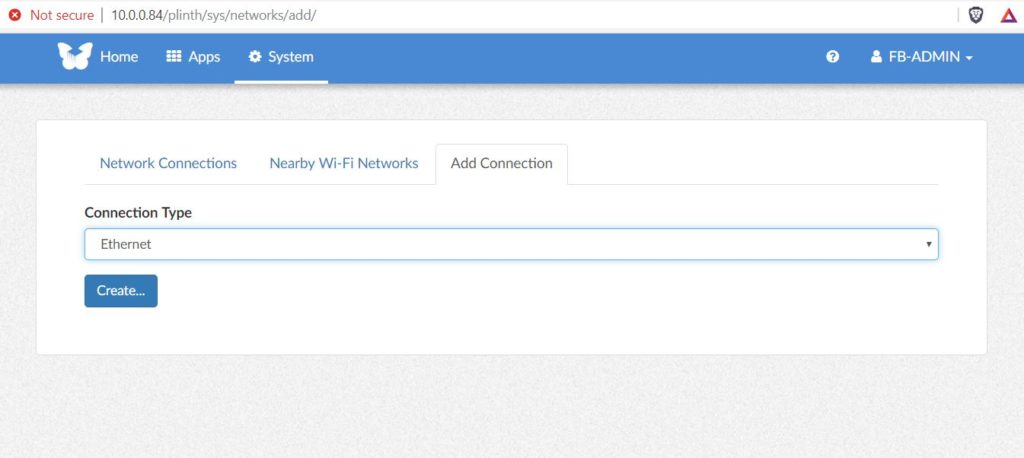
Then, in the screen that comes up, pick “Wi-Fi” in the “Connection Type” popup (it starts out saying “Ethernet.”) Moment of truth time. Click “Create.”
In the screen that comes up, you will see an option for “Physical Interface.” Click it. You should see an option which starts with “wlan.”
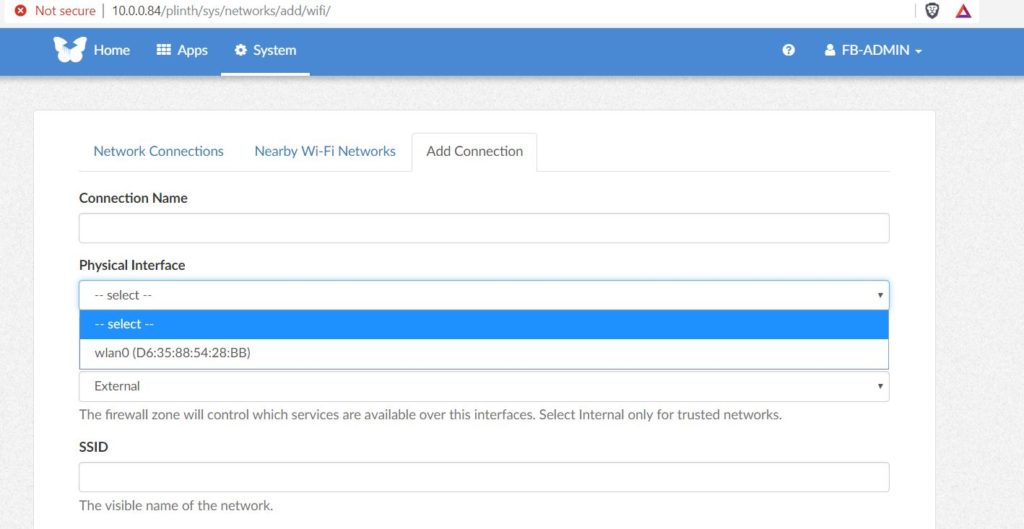
If it’s not there… you missed a step. The good news? You can start again at any part of the sequence without messing things up. (Doing the same step twice will not hurt anything.) See if you can figure out what happened, and go from there. If not… well, Step One awaits. Sorry.
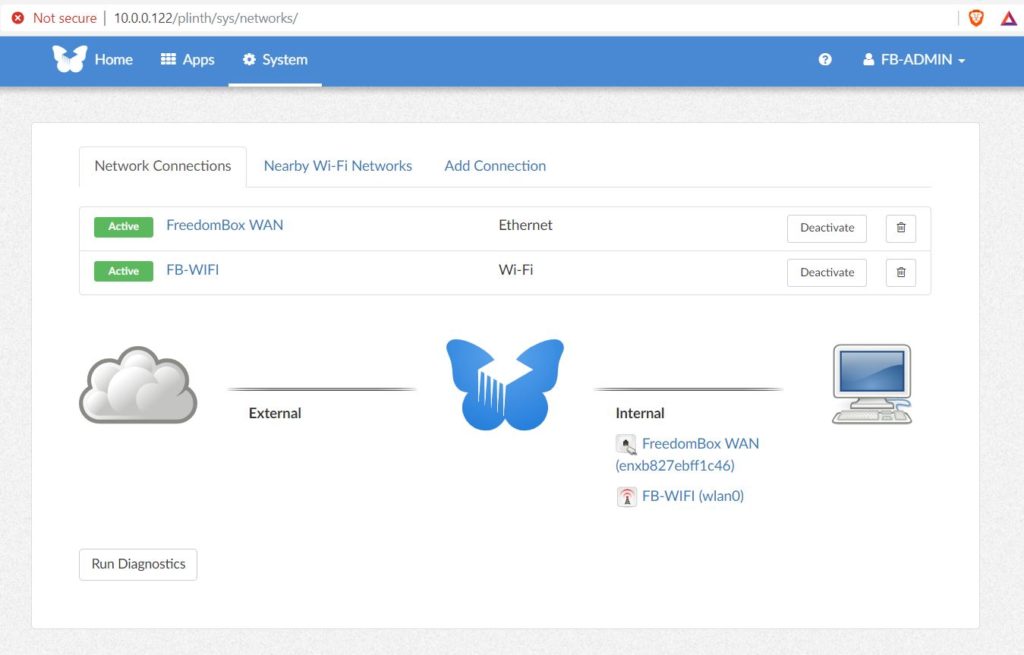
But assuming you DO see it, huzzah! Your FreedomBox software is interfacing with the RPi’s WiFi system. The finish line is in sight. Now you just need to configure the WiFi connection. Here’s an example:
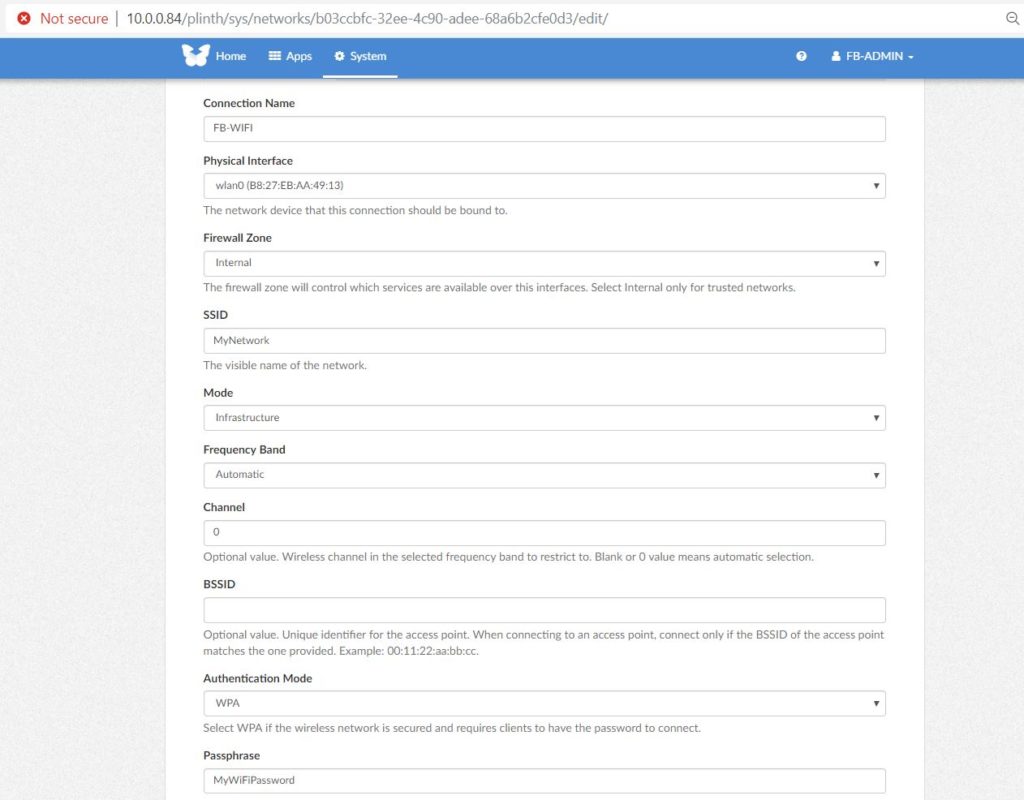
Fill in a name for the connection: I’ve put in “FB-WIFI.” That’s just an internal reference and it can be anything. Then put in the name of your WiFi router under SSID: I’ve put in “MyNetwork.” Put in whatever you usually use to hook to your WiFi. If your WiFi uses a password, set Authentication Mode to WPA and fill in the password under Passphrase: I’ve put in “MyWiFiPassword.” Then click “Create Connection” at the bottom. You should see this:
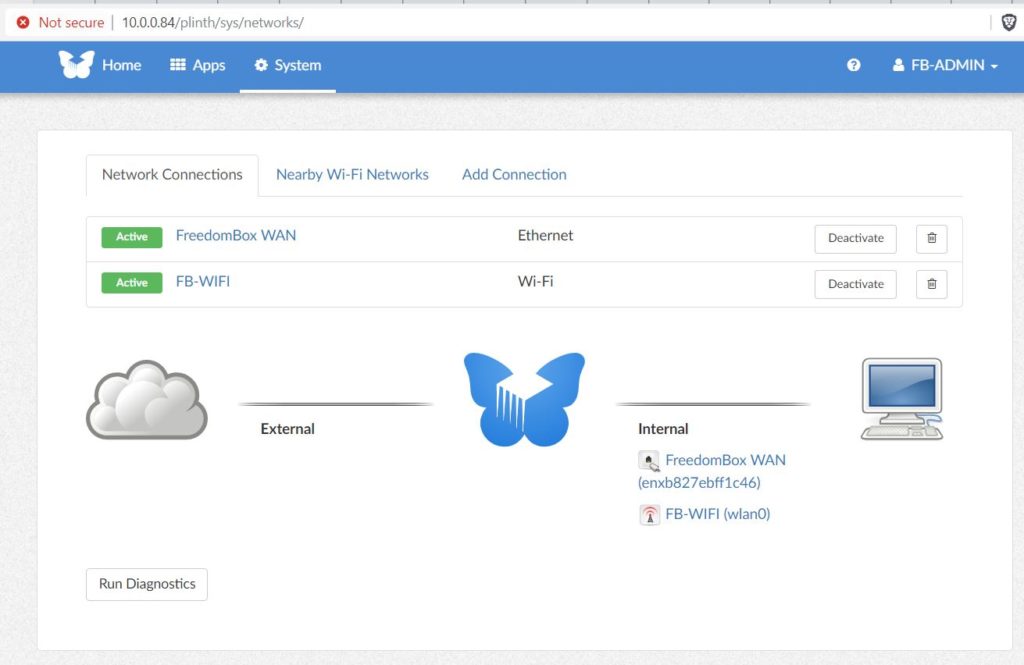
If it didn’t work, you can click on the name of the WiFi connection and edit it (make sure you put in the right name and password, etc.) then click “Edit Connection” to try again.
Congratulations! Your FreePi is online wirelessly! Now it’s time for some housekeeping.
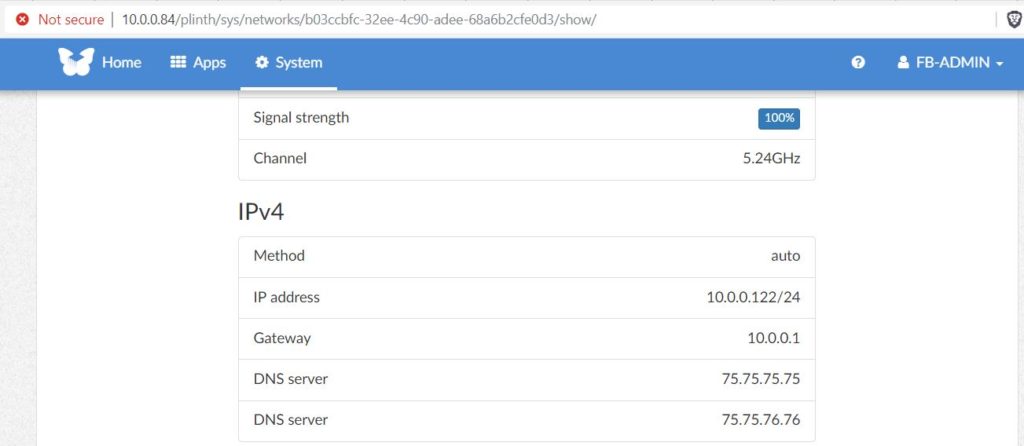
STEP THIRTEEN
Click on the name of the WiFI connection (in my example it’s “FB-WIFI”) and scroll down until you see the “IPV4 section.” Look for the IP address and make a note of it. In the example below, it’s 10.0.0.122.
Open yet another tab or browser window. Last one, I promise. Put the wireless address in the address bar and load it. You should get the Home screen. You may have to log in again: if so, use the same login info you’ve been using.
Now you know the IP address the WiFi will use – it doesn’t usually change, but if you can’t log in at some point in the future, check the client list on your Internet router and see if it got reassigned. It will have the name you gave the WiFi connection.
Next, we should shut off the Pagekite access, because we didn’t bother to set up encryption. From the Home screen, go to Settings > Pagekite > Configure Pagekite, uncheck the box that says “Enable Pagekite,” and click “Save Settings.” Now no one can access your FreedomBox from the Internet. If you want to turn it on again in future, you can just check the box and it will bring back the last settings used. Securing a Pagekite connection is doable but outside the scope of this post.
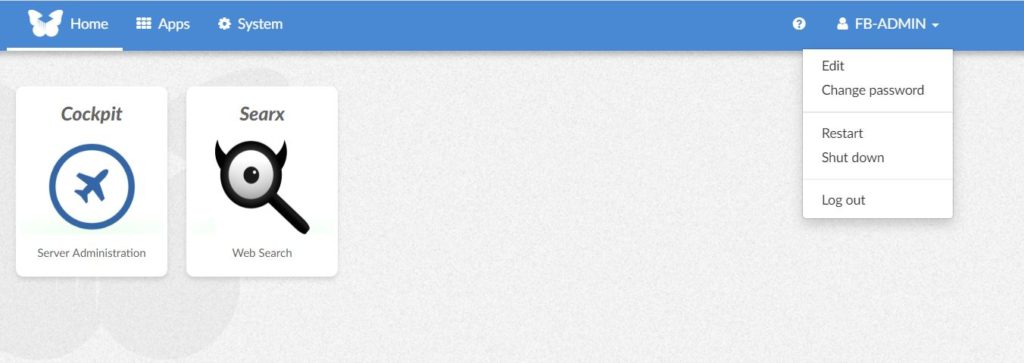
Once that’s done, we should change the password, just in case. Go up and click on your user name in the upper right and select “Change Password.”
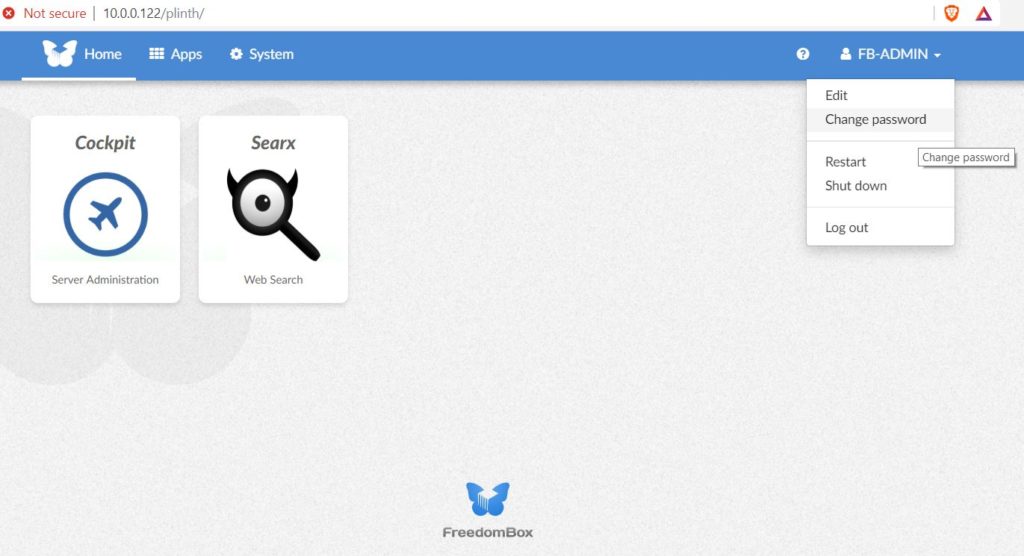
You’ll get a password change form – use it and change the password. Remember, WRITE IT DOWN. You can also add another user if you want a non-admin level user to play with.
Okay, that’s it! Your FreePi is online and the wireless networking feature is enabled. NOW I will turn you loose. Have fun!

WOW just what I was seaching for. Camee here byy searching for 1498515
To the legalinspiration.com Owner, exact right here: Link Text
Dear legalinspiration.com admin, Your posts are always well-received by the community.
To the legalinspiration.com administrator, Keep up the great work!
To the legalinspiration.com webmaster, You always provide great resources and references.
To the legalinspiration.com admin, Thanks for the well-researched post!
Hi legalinspiration.com owner, Your posts are always a great source of information.
Hi legalinspiration.com webmaster, Thanks for the well-researched and well-written post!
Hi legalinspiration.com owner, Your posts are always well-supported by facts and figures.
Hello legalinspiration.com webmaster, Thanks for the detailed post!
Hi legalinspiration.com administrator, You always provide in-depth analysis and understanding.
Dear legalinspiration.com webmaster, Your posts are always on topic and relevant.
To the legalinspiration.com administrator, Thanks for the great post!
Hi legalinspiration.com owner, Your posts are always informative and well-explained.
Hi legalinspiration.com administrator, Your posts are always well-formatted and easy to read.
Hello legalinspiration.com administrator, You always provide useful tips and best practices.
To the legalinspiration.com webmaster, Thanks for the well-presented post!
Hello legalinspiration.com admin, Your posts are always a great source of information.
Dear legalinspiration.com owner, Good job!
Hi legalinspiration.com webmaster, Your posts are always well-formatted and easy to read.
To the legalinspiration.com admin, Great job!
Hello legalinspiration.com admin, Keep sharing your knowledge!
Hi legalinspiration.com administrator, Keep up the great work!
To the legalinspiration.com webmaster, Your posts are always well presented.
Hello legalinspiration.com owner, Thanks for the well-organized and comprehensive post!
To the legalinspiration.com admin, You always provide valuable information.
Hello legalinspiration.com administrator, You always provide helpful information.
Hi legalinspiration.com webmaster, Your posts are always well-written and engaging.
Hi legalinspiration.com owner, You always provide great examples and real-world applications.
To the legalinspiration.com owner, Thanks for the well-organized and comprehensive post!
Hi legalinspiration.com administrator, Thanks for sharing your thoughts!
Hi legalinspiration.com admin, Your posts are always well researched and well written.
Hello legalinspiration.com owner, Keep sharing your knowledge!
To the legalinspiration.com administrator, Your posts are always well written and informative.
Hi legalinspiration.com owner, Thanks for sharing your thoughts!
To the legalinspiration.com administrator, Keep sharing your knowledge!
Hi legalinspiration.com admin, Thanks for the comprehensive post!
Hi legalinspiration.com admin, You always provide valuable feedback and suggestions.
To the legalinspiration.com webmaster, Thanks for the well-presented post!
Dear legalinspiration.com admin, Your posts are always a great source of knowledge.
Hi legalinspiration.com admin, Your posts are always well thought out.
Hello legalinspiration.com owner, Good work!
Dear legalinspiration.com admin, Thanks for sharing your thoughts!